
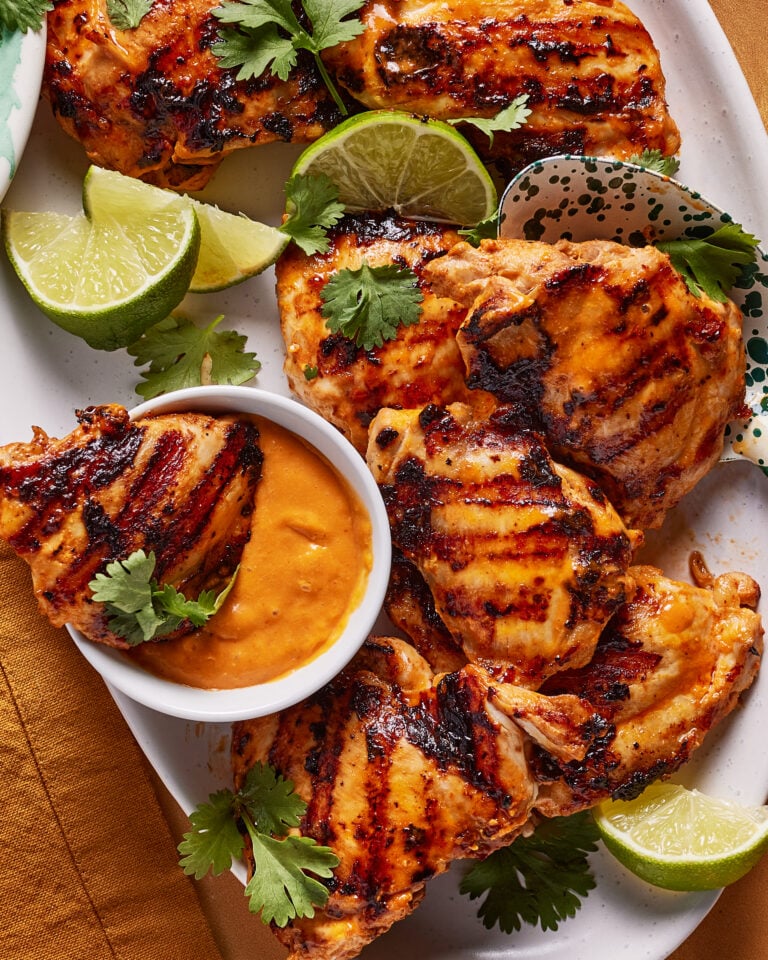
If you’ve enjoyed the magic of Greek food, then you’ll know how delicious chicken gyros are. Tender, juicy chicken that practically melts in your mouth is cooked low and slow, marinated first in a variety of spices and creamy yogurt for that rich and satisfying flavor. These are my DIY Chicken Gyros, a simple and easy way to recreate the classic chicken gyros at home.

Friends, when it comes to social media, I rarely get influenced. When it comes to beauty, fashion, or home decor, I prefer to stay in my own lane and buy the things that I like, regardless of whether or not they’re trending. But when it comes to food? That’s one area that I can be HIGHLY influenced in – especially when it comes to new kitchen tools or gadgets. That’s the origin story of how these DIY Chicken Gyros were born.
The other day, I saw my friend Food by Maria (who is Greek) share her version of at home chicken gyros, featuring this amazing vertical spit. I knew immediately that I wanted to try it – but then, once I saw my friend Sneji of The Modern Nona try it too, with amazing success? I was sold. Consider me influenced!
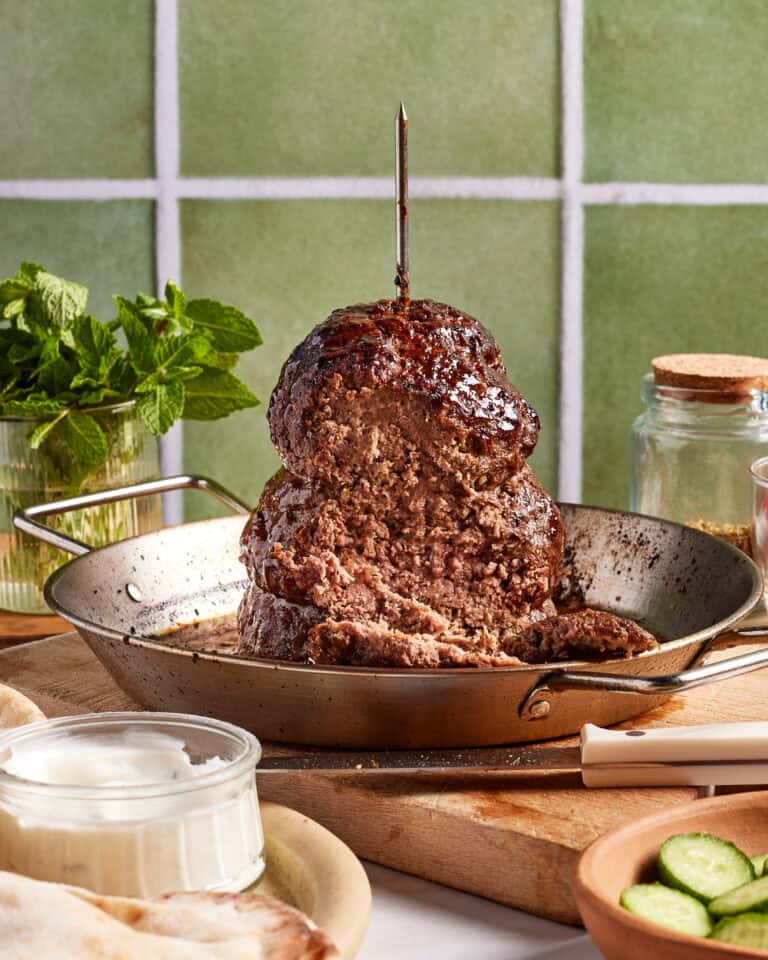
In the past, I wrote-off homemade gyros as a recipe that I could never make. After all, traditional chicken gyros are generally cooked low and slow for that melt-off-the-bone flavor that pairs perfectly with pita bread, greek salad, and homemade tzatziki. But the reality is, all it takes is a vertical spit and a few hours of patience (aka the precious marinating time that gives this chicken its flavor) to make the perfect chicken gyros at home. That’s it!
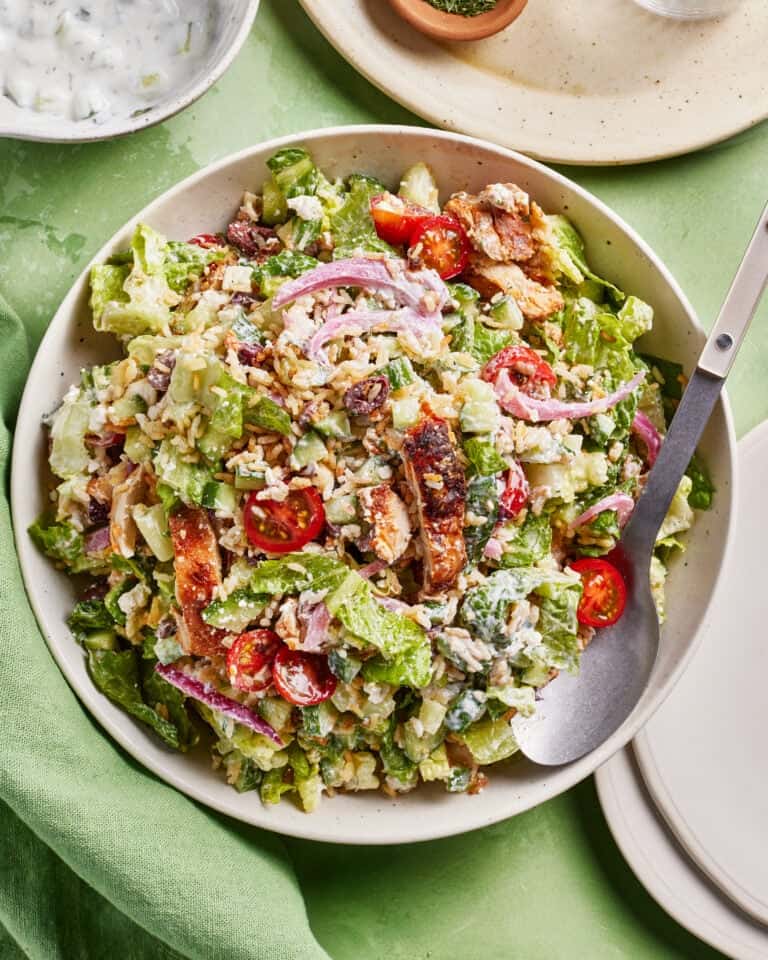
While I love adding this chicken to my Scorched Rice Loaded Chicken Gyros Bowls (which come together with crispy scorched rice, my Quick Marinated Red Onions, the chicken gyros, and a healthy pour of tzatziki), this chicken can be added to any recipe that you like. I also love pairing it with my Loaded Greek Salad or my Easy Maroulosalata for a boost of protein. But, don’t think it’s limited to just that – see below for more of my favorite serving suggestions!


What You Need to Make These Tender Chicken Gyros
- Chicken Thighs: The base of these Chicken Gyros starts with chicken thighs. Be sure to use boneless, skinless chicken thighs, so that they cook perfectly on the spit and end up being flaky, tender, and melt-in-your-mouth.
- Greek Yogurt: Not only does creamy greek yogurt make the chicken tender and juicy, but it also packs it full of protein, which will help you stay fuller, longer.
- Dijon Mustard: Dijon mustard adds the right amount of tang that helps this marinade to shine.
- Olive Oil: While I love the flavor that olive oil adds to this recipe (and, it’s used frequently in Greek cooking!) you can also opt to use another better-for-you oil, such as avocado oil. Both work just as well here.
- Garlic: I will always recommend using fresh garlic, whenever possible. It adds the best flavor to this chicken and is a classic in recreating that chicken gyro flavor.
- Lemon Juice: A squeeze of fresh lemon juice adds brightness to this chicken and helps keep it moist and tender.
- Seasonings: The combination of Italian seasoning, cumin, and paprika adds the most delicious flavor to this chicken and seasons it to perfection.

How to Make the Best Chicken Gyros At-Home
To make these chicken gyros, start by preheating your oven to 375 F. Prepare the chicken by patting the chicken thighs dry. Then, add them to a bowl alongside the greek yogurt, mashed garlic, olive oil, lemon juice, Italian seasoning, cumin, and paprika. Toss until the chicken is fully coated in the seasonings.
Cover the bowl, then transfer it into the refrigerator for a minimum of 30 minutes, but at least 3-4 hours, until the flavors have marinated into the chicken. Once the chicken is done marinating, remove it from the fridge.


Grease the vertical spit with oil, then layer the chicken thighs on it. Place the spit on the lower rack of the oven and allow the chicken to bake for 1.5 hours, or until the internal temperature reaches 165 F. Be sure to watch the chicken carefully – if it gets too browned on the top, around the 50-60 minute mark, remove the spit from the oven, cover the top of chicken with a small piece of foil, and return it from the oven.
Once the chicken is done, remove it from the oven and use a spoon to scoop the juices onto the chicken. Slice the chicken, then add it to your favorite recipes, and enjoy!
Frequently Asked Questions
Yes! You can prepare this chicken ahead of time two different ways. The first, is to follow steps 1-4 on the recipe card below, allowing the chicken to marinate in the fridge for up to 24 hours. The second is to prepare the chicken all the way through, then allow it to cool. Once it’s cool, transfer it to an airtight container and store it in the fridge until you’re ready to enjoy it. It should stay fresh for up to one week!
I recommend marinating the chicken for at least 3-4 hours, or up to overnight. While, at very minimum, you can marinate it for 30 minutes, the longer it sits, the better the flavor will be.
I recommend serving this chicken in my Scorched Rice Loaded Chicken Gyro Bowls! However, you can also add it to your favorite salads and pasta dishes for a boost of protein, or serve it alongside rice and roasted veggies for a simple and easy dinner. Just don’t forget the pita bread!
If you make this recipe, please be sure to leave a review and rating below! To see more recipes and behind the scenes, follow along on Instagram, TikTok, and Youtube! I’m also now on Pinterest, so stop by and take a look at what’s new.
** Photography by Tanya Pilgrim
Equipment
- Vertical Spit this vertical spit is essential to making this chicken!
Ingredients
- 1.5 Pounds Boneless Skinless Chicken Thighs
- 1 Cup Greek Yogurt
- 2 Tablespoons Dijon Mustard
- ¼ Cup Olive Oil
- 3 Cloves Garlic, mashed
- 1 Lemon, juiced – this is approximately 1/4 cup
- 2 Tablespoons Italian Seasoning
- 2 Teaspoons Cumin
- 1 Teaspoon Paprika
Instructions
- To make these chicken gyros, start by preheating your oven to 375 F.
- Prepare the chicken by patting the chicken thighs dry.
- Then, add them to a bowl alongside the greek yogurt, mashed garlic, olive oil, lemon juice, Italian seasoning, cumin, and paprika. Toss until the chicken is fully coated in the seasonings.
- Cover the bowl, then transfer it into the refrigerator for a minimum of 30 minutes, but at least 3-4 hours, until the flavors have marinated into the chicken.
- Once the chicken is done marinating, remove it from the fridge.
- Grease the vertical spit with oil, then layer the chicken thighs on it.
- Place the spit on the lower rack of the oven and allow the chicken to bake for 1.5 hours, or until the internal temperature reaches 165 F. Be sure to watch the chicken carefully – if it gets too browned on the top, around the 50-60 minute mark, remove the spit from the oven, cover the top of chicken with a small piece of foil, and return it from the oven.
- Once the chicken is done, remove it from the oven and use a spoon to scoop the juices onto the chicken.
- Slice the chicken, then add it to your favorite recipes, and enjoy!

Rate & review
SELECT A RATING and tell me what you think!
What others are saying
Tried this tonight and was very excited but ran into some trouble getting the meat closest to the center up to temp… tried increasing the temp to 400 and covering the whole thing but still waiting for the center part to cook. Any advice on what I may have done wrong?
Oh no! I recommend covering and turning the temp up to 425… every oven is different!
I made this after I went and bought the drip pan. So easy and quick to make. I would adjust a few seasonings but that really is just personal taste. It was so juicy and tender. Putting it in a wrap was too heavy for me, so I put all the Gyro toppings and chicken on lettuce while my husband had a wrap. We both loved it. Looking forward to the leftovers!
Tender
delicious and easy!